 Chicagoland’s Largest Selection of Halloween Costumes, Accessories, and more!
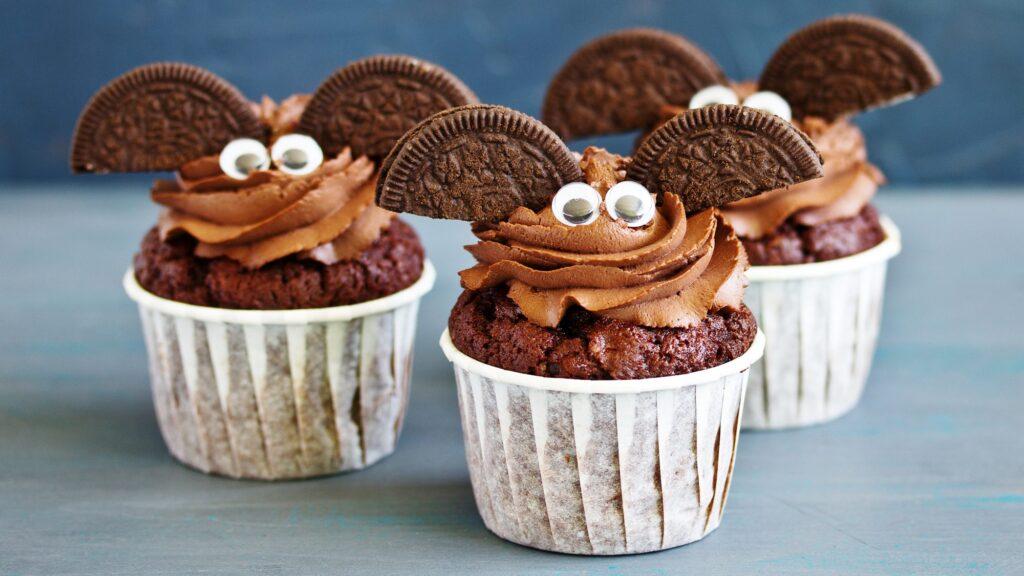
Easy Desserts for Halloween
It’s time to get creative and start planning what you’re going to be for Halloween. But if you want a quick, easy dessert option that will wow your guests this year, we have just the thing! These 7 easy recipes are sure to satisfy any sweet tooth and they take only minutes to whip up. So don’t worry about spending hours in the kitchen making something complicated. No one has time for that on Halloween night because they’ll be too busy scaring the pants off of their neighbors!
My Halloween Land has easy desserts for Halloween. They are delicious and so easy to make. You can trust them with your Halloween party. They also have products that can help you with your Halloween party. They have tons of costumes and decorations. You’ll find the perfect one! but before that, here are the easiest dessert recipes that you can make for your Halloween party.
The Best and Easy Desserts For Halloween Recipes
1. Monster Mask Cookies
There might seem to be a lot going on, but it’s not. Sugar cookie dough can be shaped into a witch, vampire, mummy, or Frankenstein by using a mask template.
Ingredients:
- 2 3/4 c. all-purpose flour
- 1/2 tsp. baking powder
- 1/4 tsp. kosher salt
- 1 c. unsalted butter
- 3/4 c. granulated sugar
- 1 large egg
- 1 1/2 tsp. Pure vanilla extract
Instructions:
- To make the batter, whisk together flour, baking powder, and salt.
- Combine the butter and sugar in an electric mixer and beat until light and fluffy. Beat in the egg and then the vanilla.
- Add the flour mixture slowly and mix until incorporated, reducing the mixer speed to low. Roll each disk into an eighth-inch thick disk between 2 sheets of wax paper. Refrigerate or freeze for 30 minutes or until firm.
- Heat oven to 350 degrees F. Place parchment paper on a baking tray. Cut out cookies with floured cookie cutters. Line baking sheets with cookies. Cut scraps, reroll, and chill.
- The cookies should be lightly golden brown around the edges, 10 to 12 minutes after baking. Rotate the pans halfway through. Before transferring to wire racks to cool completely, let cool on the sheets for 5 minutes.
2. Candy Cobwebs
Malt-ball creatures adorned with white chocolate covers are so irresistible, even arachnophobes can’t resist.
Ingredients:
- 5 oz. Pretzel sticks (about 3 cups)
- 35 Oreos
- 1 1/4 lb. white chocolate, chopped
- 2 oz. semisweet chocolate, chopped
- Small and large chocolate covered malt balls, halved
- Black royal icing
Instructions:
- The two long sides of a 9 x 13-inch pan should have at least 1 inch of overhang. Line the pan with parchment paper.
- Place pretzels or cookies on the bottom of the pan to completely cover it.
- Melt the white chocolate in a medium microwave-safe bowl using fifty percent power for 30 seconds at a time, until smooth. Place the pretzels or cookies on a plate and carefully pour the white chocolate over them. Spread evenly with an offset spatula.
- Melt semisweet chocolate on 50 percent power for 30 seconds at a time in a small microwave-safe bowl. Put the webs in a small bag, cut off a corner, and leave at room temperature for 5 minutes.
- Make spiders by placing white chocolate on the cut sides of the malt balls, then adding little black eyes and legs with royal icing.
3. Spooky Forest Pudding Cups
You’ll enjoy these fun, chocolate-filled pudding cups arranged together on your Halloween dessert table. These trees can be decorated with sprinkles to add a little extra flavor.
Ingredients:
- 1 1/2 c. sugar
- 1/2 c. unsweetened cocoa powder
- 1/3 c. cornstarch
- 1/2 tsp. kosher salt
- 3 1/2 c. whole milk
- 6 large egg yolks
- 8 oz. semisweet chocolate, chopped
- 4 tbsp. unsalted butter
- 4 tbsp. Pure vanilla extract
- 20 whole chocolate sandwich cookies, plus 12 crushed
- 1 1/2 c. chocolate candy melts
- 4- or 6-inch bamboo skewers
- Chocolate sprinkles, optional
- Candy pumpkins, for decorating
Instructions:
- Sugar, cocoa, cornstarch, and salt should be stirred together in a medium saucepan. Milk and eggs should then be added. Stirring constantly, cook mixture until it just begins to bubble and thicken, 5 to 7 minutes. Avoid scorching the bottom and inside corners of the pan by stirring them. Remove the pan from the heat. Melt the butter, add the chocolate, and then add the vanilla. Stir until smooth and the chocolate is melted.
- Ten juice glasses (each about 6 ounces) should be filled with 1 whole cookie each. Distribute half of the pudding evenly among the glasses. Add a second cookie on top. Divide the remaining pudding among the glasses evenly. Sprinkle the crushed cookies evenly over the pudding; cover and chill.
- Line a baking sheet with parchment paper and place a tree template underneath it. Pour candy melts over the tree template and melt according to package directions. Make a small hole in one corner of a heavy-duty zip-top bag. Place bamboo skewers on top of a line of melted chocolate on the trunks of the trees. To create trees, pipe chocolate over the bamboo skewer and over the rest of the template (you don’t have to follow it exactly, this can be done loosely). Add chocolate sprinkles to the leaves. Place in the fridge until set.
- Put chocolate trees into pudding glasses and top with candy pumpkins.
4. Chocolate Tombstone Cookies
Make these chocolate butter cookies and white chocolate skulls to satisfy your chocolate cravings.
Ingredients:
- 1 batch Chocolate Cookie Dough (see below)
- 1 bag Wilton White Candy Melts
- 2 bottles or 1 bottle (20 oz) Wilton White Cookie Icing
- Black Wilton Food Writer Edible
- Color Marker
- You will need: Wilton Tombstone
- Cookie Cutters (4″x3″ and 3″x2 1⁄4″),
- Wilton Skull Candy Mold
Instructions:
- Heat oven to 350°F. Prepare two baking sheets with parchment paper. Roll out dough to 1/3 inch on a floured surface or silicone baking mat. thick. Cut out shapes with tombstone cookie cutters. Place them on baking sheets 1 1/2 inches apart.
- Let them bake for about 15 minutes or until firm. Remove to a wire rack to cool completely, then cool for 2 minutes on the rack. Using the remaining scraps, reroll, cut, and bake the cookies.
- Scoop spoons of melted candy into the molds to make skulls. Refrigerate or freeze mold for 10 to 30 minutes, until candy is hard. A flat surface is best for unmolding the mold. As many skulls as you like can be made with the remaining melted candy melts.
- White icing should be heated as directed on the package to create white tombstones. To smooth the icing, squeeze it onto half of the tombstone cookies and spread with an offset spatula. Allow drying for about an hour.
- Draw details with a black edible marker on the white cookies. You can attach skulls with a dollop of cooled white icing if you wish.
- Use white icing to decorate plain chocolate cookies. Use the included tips to create basic designs. If you want finer details, transfer the icing to a pastry bag equipped with a plain #2 or #3 tip. If desired, attach skulls with a dollop of icing.
5. Chocolate Spiderweb Sandwich Cookies
There are few things better than a cookie sandwich… other than a cookie sandwich topped with orange spiderweb-like frosting.
Ingredients:
- 1 3/4 c. all-purpose flour
- 3/4 c. unsweetened cocoa
- 1/4 tsp. baking soda
- 1/4 tsp. kosher salt
- 1 c. unsalted butter
- 3/4 c. granulated sugar
- 1 tsp. Pure vanilla extract
- 1 large egg
- 12 oz. cream cheese
- 1 1/2 c. confectioners’ sugar
- Orange gel or paste food color
Instructions:
- Whisk together the flour, cocoa, baking soda, and salt in a medium bowl.
- Mix together the butter, granulated sugar, and vanilla. Beat in the egg and beat until light and fluffy. Beat the flour mixture until it is well incorporated after reducing the mixer to low.
- Shape the dough into an 8-inch round on a piece of plastic wrap. log. Make sure to wrap up and refrigerate until firm, at least four hours and up to two days.
- Heat oven to 350°F. Make 28 pieces of dough by unwrapping it and cutting it into 1/4-inch-thick slices. Spread them out 2 inches apart on ungreased baking sheets. Let them bake for 4 minutes. After 4 to 5 minutes more, rotate the sheets and bake the cookies until they are set. Transfer the baked goods to a wire rack to cool completely after 5 minutes.
- In a bowl, beat the cream cheese with an electric mixer until smooth. Beat until light and fluffy, about three minutes after adding the confectioners’ sugar. Half of the icing should be transferred to a bowl and tinted orange, then spooned into a resealable plastic bag.
- Sandwich the remaining cookies with the remaining frosting and 14 of the remaining cookies. Each sandwich should have spiderwebs on the top if you snip a small piece off the corner of the bag.
6. Buggy Leaf Spice Cookies
Who knew cookies with bugs could look so adorable? A mixture of apple or pumpkin spice is mixed into the dough to make these sugar cookies.
Ingredients:
- 1 c. all-purpose flour
- 4 tsp. apple pie spice or pumpkin pie spice
- 2 logs of refrigerated sugar cookie dough
- Brown gel or paste food color
- You’ll need: assorted sizes of leaf-shaped cookie cutters (3 1/2- to 6-in.)
- Decoration: tubes of orange, green, and yellow decorating icing with plastic writing tips attached; yellow decorating sugar; ladybug and caterpillar graham cracker cookies (Keebler Bug Bites); a clean artist’s brush; black writing gel; red nonpareil candies
Instructions:
- Knead flour, spices, and brown food coloring into cookie dough in a large bowl until the gingerbread-colored dough has been achieved. Half the cookie dough. Make a disk that’s about one inch thick. Separately wrap it. Place in the refrigerator for an hour or until firm.
- Preheat the oven to 350°F. Make sure you have baking sheets handy. Place 1 dough disk at a time between sheets of wax paper and roll it to 1/8 inch thick. Cut out leaves with floured cutters. 1 inch apart, transfer cutouts to an ungreased baking sheet with a floured spatula. Remove scraps and reroll. Cut leaf veins into each cookie.
- Allow cookies to bake for 14 minutes. Cool cookies on a wire rack for five minutes before transferring to a rack.
- Pipe decorating icing into the veins of leaves to decorate them. Put decorating icing on cookies and sprinkle sugar on the icing.
- Decorating ladybugs and caterpillars with orange decorating icing is easy with a paintbrush and a photo as a guide: Thin some orange decorating icing with water and brush it onto ladybug cookies using the cookie’s design as a guide. At least two hours should be allowed for cookies to dry. Write in the spots, legs, and head of the ladybugs in black writing gel. Use two nonpareils for the eyes. Create caterpillars by thinning green decorating icing with water and painting it on the cookie. With a yell, place a nonpareil eye and pipe legs.
7. Snake Cake
Delicious desserts for Halloween made with Marshmallow Crispy Treats, Royal Icing, and Halloween candy!
Ingredients:
- 1 batch favorite marshmallow crispy treats recipe
- 1 batch royal icing
- Marshmallows, M&M’s, fruit leather, and crushed chocolate wafers
Instructions:
- Grease a 9-inch round springform pan and press marshmallow crispy treats into it.
- When the pan has cooled, trace a 28-ounce can around the pan’s center and cut out a 4-inch circle. Slice the outer circle in half.
- The two macaroni-shaped pieces should be separated and arranged into a curved snake as shown. To shape the head, slice off the sides at a slight angle.
- Using icing, frost, and decorate with marshmallows for eyes, M&M’s for scales, and fruit leather for the tongue. Make “dirt” with crushed chocolate wafers.
We hope you enjoyed our roundup of 7 easy recipes desserts for Halloween. The holiday is a great time to create new memories and enjoy delicious treats with your family and friends! With these simple recipes, it’s now easier than ever before to make something delightful in the kitchen. Whether it be from scratch or from a box mix, we have all bases covered here. As long as you can feel the Halloween spirit, you can make these treats.
Want an eerie recipe? Halloween Land has many to choose from.
Try these easy toothsome specialties to enjoy this spooky holiday!
See more Delicious Recipes on our Website:
- Super Easy To Make Halloween Witches’ Hats!
- 5 Ways to Make Caramel Apples Look & Taste Even Better
- Frighten Your Friends with these 20 Easy, Insane Halloween Recipes!